Scripts
This section contains a collection of useful scripts for quality control during the training of models.
ivadomed_segment_image
- segment_image(fname_images: str, path_model: str, suffix_out: str, options: dict)[source]
Applies a trained model on image(s). Output predictions are generated in the current directory.
For example:
ivadomed_segment_image -i t2s.nii.gz -m /usr/bob/my_model_directory
- Parameters:
fname_images (str) – Image(s) to segment. You can specify more than one image (separate with space). Flag:
--image,-ipath_model (str) – Path to folder that contains ONNX and/or PT model and ivadomed JSON config file. Flag:
--model,-msuffix_out (str) – Suffix to add to the input image. Default: ‘_pred’. Flag:
--suffix-out,-soptions (dict) – Options to pass to imed_inference.segment_volume.
- Returns:
None
ivadomed_visualize_transforms
- run_visualization(input, config, number, output, roi)[source]
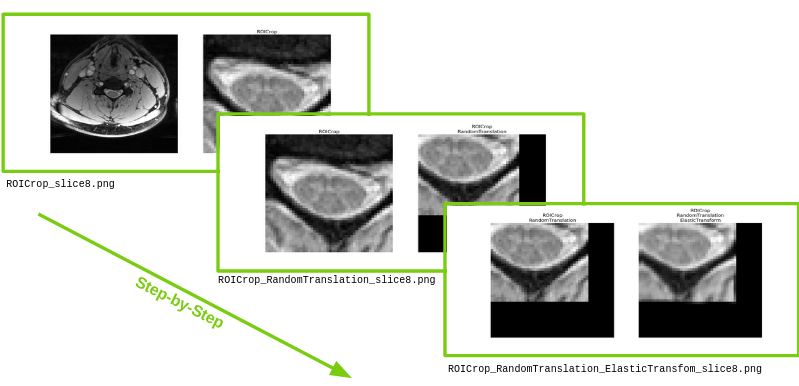
Utility function to visualize Data Augmentation transformations.
Data augmentation is a key part of the Deep Learning training scheme. This script aims at facilitating the fine-tuning of data augmentation parameters. To do so, this script provides a step-by-step visualization of the transformations that are applied on data.
This function applies a series of transformations (defined in a configuration file
-c) to-n2D slices randomly extracted from an input image (-i), and save as png the resulting sample after each transform.For example:
ivadomed_visualize_transforms -i t2s.nii.gz -n 1 -c config.json -r t2s_seg.nii.gz
Provides a visualization of a series of three transformation on a randomly selected slice:
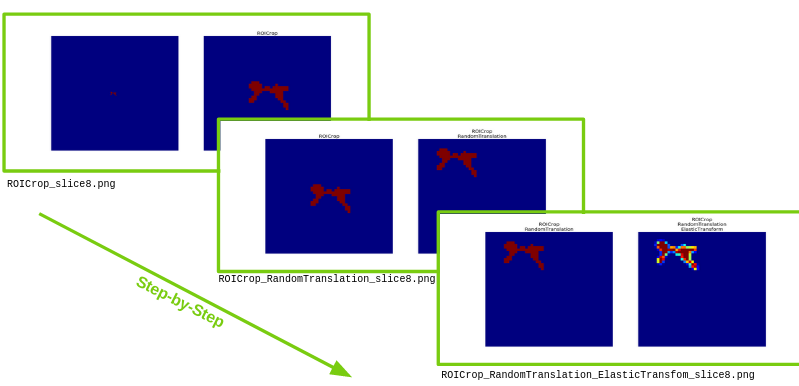
And on a binary mask:
ivadomed_visualize_transforms -i t2s_gmseg.nii.gz -n 1 -c config.json -r t2s_seg.nii.gz
Gives:
- Parameters:
input (string) – Image filename. Flag:
--input,-iconfig (string) – Configuration file filename. Flag:
--config,-cnumber (int) – Number of slices randomly extracted. Flag:
--number,-noutput (string) – Folder path where the results are saved. Flag:
--ofolder,-oroi (string) – Filename of the region of interest. Only needed if ROICrop is part of the transformations. Flag:
--roi,-r
ivadomed_convert_to_onnx
- convert_pytorch_to_onnx(model, dimension, n_channels, gpu_id=0)[source]
Convert PyTorch model to ONNX.
The integration of Deep Learning models into the clinical routine requires cpu optimized models. To export the PyTorch models to ONNX format and to run the inference using ONNX Runtime is a time and memory efficient way to answer this need.
This function converts a model from PyTorch to ONNX format, with information of whether it is a 2D or 3D model (
-d).- Parameters:
model (string) – Model filename. Flag:
--model,-m.dimension (int) – Indicates whether the model is 2D or 3D. Choice between 2 or 3. Flag:
--dimension,-dgpu_id (string) – GPU ID, if available. Flag:
--gpu_id,-g
ivadomed_automate_training
- automate_training(file_config, file_config_hyper, fixed_split, all_combin, path_data=None, n_iterations=1, run_test=False, all_logs=False, thr_increment=None, multi_params=False, output_dir=None, plot_comparison=False)[source]
Automate multiple training processes on multiple GPUs.
Hyperparameter optimization of models is tedious and time-consuming. This function automatizes this optimization across multiple GPUs. It runs trainings, on the same training and validation datasets, by combining a given set of parameters and set of values for each of these parameters. Results are collected for each combination and reported into a dataframe to allow their comparison. The script efficiently allocates each training to one of the available GPUs.
Usage Example:
ivadomed_automate_training -c config.json -p config_hyper.json -n n_iterations
Example of dataframe path_output
training_parameters
best_training_dice
best_training_loss
best_validation_dice
best_validation_loss
test_dice
0
testing_script-batch_size=2
{‘batch_size’: 2, ‘loss’: {‘name’: ‘DiceLoss’}, ‘training_time’: {‘num_epochs’: 1, ‘early_stopping_patience’: 50, ‘early_stopping_epsilon’: 0.001}, ‘scheduler’: {‘initial_lr’: 0.001, ‘lr_scheduler’: {‘name’: ‘CosineAnnealingLR’, ‘base_lr’: 1e-05, ‘max_lr’: 0.01}}, ‘balance_samples’: False, ‘mixup_alpha’: None, ‘transfer_learning’: {‘retrain_model’: None, ‘retrain_fraction’: 1.0}}
-0.002152157641830854
-0.002152157641830854
-0.0013434450065687997
-0.0013434450065687997
0.011467444120505346
1
testing_script-batch_size=4
{‘batch_size’: 4, ‘loss’: {‘name’: ‘DiceLoss’}, ‘training_time’: {‘num_epochs’: 1, ‘early_stopping_patience’: 50, ‘early_stopping_epsilon’: 0.001}, ‘scheduler’: {‘initial_lr’: 0.001, ‘lr_scheduler’: {‘name’: ‘CosineAnnealingLR’, ‘base_lr’: 1e-05, ‘max_lr’: 0.01}}, ‘balance_samples’: False, ‘mixup_alpha’: None, ‘transfer_learning’: {‘retrain_model’: None, ‘retrain_fraction’: 1.0}}
-0.0017151038045994937
-0.0017151038045994937
-0.000813339815067593
-0.000813339815067593
0.030501089324618737
Config File:
The config file is the standard config file used in
ivadomedfunctions. We use this as the basis. We call a key of this config file acategory. In the example below, we would say thattraining_parameters,default_model, andpath_outputarecategories.{ "training_parameters": { "batch_size": 18, "loss": {"name": "DiceLoss"} }, "default_model": { "name": "Unet", "dropout_rate": 0.3, "depth": 3 }, "model_name": "seg_tumor_t2", "path_output": "./tmp/" }
Hyperparameter Config File:
The hyperparameter config file should have the same layout as the config file. To select a hyperparameter you would like to vary, just list the different options under the appropriate key, which we call the
base_key. In the example below, we want to vary theloss,depth, andmodel_name; these are our 3base_keys. As you can see, we have listed our different options for these keys. Fordepth, we have listed2,3, and4as our different options. How we implement this depends on 3 settings:all_combin,multi_param, or the default.{ "training_parameters": { "loss": [ {"name": "DiceLoss"}, {"name": "FocalLoss", "gamma": 0.2, "alpha" : 0.5} ], }, "default_model": {"depth": [2, 3, 4]}, "model_name": ["seg_sc_t2star", "find_disc_t1"] }
Default:
The default option is to change only one parameter at a time relative to the base config file. We then create a list of config options, called
config_list. Using the examples above, we would have2 + 2 + 3 = 7different config options:config_list = [ { "training_parameters": { "batch_size": 18, "loss": {"name": "DiceLoss"} }, "default_model": { "name": "Unet", "dropout_rate": 0.3, "depth": 3 }, "model_name": "seg_tumor_t2", "path_output": "./tmp/-loss={'name': 'DiceLoss'}" }, { "training_parameters": { "batch_size": 18, "loss": {"name": "FocalLoss", "gamma": 0.2, "alpha": 0.5} }, "default_model": { "name": "Unet", "dropout_rate": 0.3, "depth": 3 }, "model_name": "seg_tumor_t2", "path_output": "./tmp/-loss={'name': 'FocalLoss', 'gamma': 0.2, 'alpha': 0.5}" }, { "training_parameters": { "batch_size": 18, "loss": {"name": "DiceLoss"} }, "default_model": { "name": "Unet", "dropout_rate": 0.3, "depth": 2 }, "model_name": "seg_tumor_t2", "path_output": "./tmp/-depth=2" }, # etc ... ]
All Combinations:
If we select the
all_combinoption, we will create a list of configuration options combinatorically. Using the config examples above, we would have2 * 3 * 2 = 12different config options. I’m not going to write out the wholeconfig_listbecause it’s quite long, but here are the combinations:loss = DiceLoss, depth = 2, model_name = "seg_sc_t2star" loss = FocalLoss, depth = 2, model_name = "seg_sc_t2star" loss = DiceLoss, depth = 3, model_name = "seg_sc_t2star" loss = FocalLoss, depth = 3, model_name = "seg_sc_t2star" loss = DiceLoss, depth = 4, model_name = "seg_sc_t2star" loss = FocalLoss, depth = 4, model_name = "seg_sc_t2star" loss = DiceLoss, depth = 2, model_name = "find_disc_t1" loss = FocalLoss, depth = 2, model_name = "find_disc_t1" loss = DiceLoss, depth = 3, model_name = "find_disc_t1" loss = FocalLoss, depth = 3, model_name = "find_disc_t1" loss = DiceLoss, depth = 4, model_name = "find_disc_t1" loss = FocalLoss, depth = 4, model_name = "find_disc_t1"
Multiple Parameters:
The
multi_paramsoption entails changing all the first elements from the list, then all the second parameters from the list, etc. If the lists are different lengths, we will just use the firstnelements. In our example above, the lists are of length 2 or 3, so we will only use the first 2 elements:loss = DiceLoss, depth = 2, model_name = "seg_sc_t2star" loss = FocalLoss, depth = 3, model_name = "find_disc_t1"
- Parameters:
file_config (string) – Configuration filename, which is used as skeleton to configure the training. This is the standard config file used in
ivadomedfunctions. In the code, we call the keys from this config filecategories. Flag:--config,-cfile_config_hyper (string) –
json file containing parameters configurations to compare. Parameter “keys” of this file need to match the parameter “keys” of config file. Parameter “values” are in a list. Flag:
--config-hyper,-chExample:
{"default_model": {"depth": [2, 3, 4]}}
fixed_split (bool) – If True, all the experiments are run on the same training/validation/testing subdatasets. Flag:
--fixed-splitall_combin (bool) – If True, all parameters combinations are run. Flag:
--all-combinn_iterations (int) – Controls the number of time that each experiment (ie set of parameter) are run. Flag:
--n-iteration,-nrun_test (bool) – If True, the trained model is also run on the testing subdataset and violiplots are displayed with the dicescores for each new output folder created. Flag:
--run-testall_logs (bool) – If True, all the log directories are kept for every iteration. Flag:
--all-logs,-lthr_increment (float) – A threshold analysis is performed at the end of the training using the trained model and the validation sub-dataset to find the optimal binarization threshold. The specified value indicates the increment between 0 and 1 used during the ROC analysis (e.g. 0.1). Flag:
-t,--thr-incrementmulti_params (bool) – If True, more than one parameter will be change at the time from the hyperparameters. All the first elements from the hyperparameters list will be applied, then all the second, etc.
output_dir (str) – Path to where the results will be saved.
- HyperparameterOption(base_key=None, option=None, base_option=None)[source]
Hyperparameter option to edit config dictionary.
This class is used to edit a standard config file. For example, say we want to edit the following config file:
{
    "training_parameters": {
        "batch_size": 18,
        "loss": {"name": "DiceLoss"}
    },
    "default_model":     {
        "name": "Unet",
        "dropout_rate": 0.3,
        "depth": 3
    },
    "model_name": "seg_tumor_t2",
    "path_output": "./tmp/"
}
Say we want to change the
loss. We could have:base_key = "loss" base_option = {"name": "FocalLoss", "gamma": 0.5} option = {"training_parameters": {"loss": {"name": "FocalLoss", "gamma": 0.5}}}
- Attributes:
base_key (str) – the key whose value you want to edit.
option (dict) – the full tree path to the value you want to insert.
base_option (dict) – the value you want to insert.
name (str) – the name to be used for the output folder.
- get_param_list(my_dict, param_list, superkeys)[source]
Recursively create the list of hyperparameter options.
- Parameters:
my_dict (dict) – A dictionary of parameters.
param_list (list)(HyperparameterOption) – A list of HyperparameterOption objects.
superkeys (list)(str) – TODO
- Returns:
A list of HyperparameterOption objects.
- Return type:
list, HyperparameterOption
- make_config_list(param_list, initial_config, all_combin, multi_params)[source]
Create a list of config dictionaries corresponding to different hyperparameters.
- Parameters:
param_list (list)(HyperparameterOption) – A list of the different hyperparameter options.
initial_config (dict) –
The original config file, which we use as a basis from which to modify our hyperparameters.
{
    "training_parameters": {
        "batch_size": 18,
        "loss": {"name": "DiceLoss"}
    },
    "default_model":     {
        "name": "Unet",
        "dropout_rate": 0.3,
        "depth": 3
    },
    "model_name": "seg_tumor_t2",
    "path_output": "./tmp/"
}
all_combin (bool) – If true, combine the hyperparameters combinatorically.
multi_params (bool) – If true, combine the hyperparameters by index in the list, i.e. all the first elements, then all the second elements, etc.
- Returns:
A list of configuration dictionaries, modified by the hyperparameters.
config_list = [
    {
        "training_parameters": {
            "batch_size": 18,
            "loss": {"name": "DiceLoss"}
        },
        "default_model":     {
            "name": "Unet",
            "dropout_rate": 0.3,
            "depth": 3
        },
        "model_name": "seg_tumor_t2",
        "path_output": "./tmp/-loss={'name': 'DiceLoss'}"
    },
    {
        "training_parameters": {
            "batch_size": 18,
            "loss": {"name": "FocalLoss", "gamma": 0.2, "alpha": 0.5}
        },
        "default_model":     {
            "name": "Unet",
            "dropout_rate": 0.3,
            "depth": 3
        },
        "model_name": "seg_tumor_t2",
        "path_output": "./tmp/-loss={'name': 'FocalLoss', 'gamma': 0.2, 'alpha': 0.5}"
    },
    # etc...
]
- Return type:
list, dict
- update_dict(d, u, base_key)[source]
Update a given dictionary recursively with a new sub-dictionary.
Example 1:
d = {
    'foo': {
        'bar': 'some example text',
        'baz': {'zag': 5}
    }
}
u = {'foo': {'baz': {'zag': 7}}}
base_key = 'zag'
>>> print(update_dict(d, u, base_key))
{
    'foo': {
        'bar': 'some example text',
        'baz': {'zag': 7}
    }
}
Example 2:
d = {
    'foo': {
        'bar': 'some example text',
        'baz': {'zag': 5}
    }
}
u = {'foo': {'baz': {'zag': 7}}}
base_key = 'foo'
>>> print(update_dict(d, u, base_key))
{
    'foo': {
        'baz': {'zag': 7}
    }
}
- Parameters:
d (dict) – A dictionary to update.
u (dict) – A subdictionary to update the original one with.
base_key (str) – the string indicating which level to update.
- Returns:
An updated dictionary.
- Return type:
dict
ivadomed_compare_models
- compute_statistics(dataframe, n_iterations, run_test=True, csv_out='comparison_models.csv')[source]
Compares the performance of models at inference time on a common testing dataset using paired t-tests.
It uses a dataframe generated by
scripts/automate_training.pywith the parameter--run-test(used to run the models on the testing dataset). It output dataframes that stores the different statistic (average, std and p_value between runs). All can be combined and stored in a csv.Example of dataframe path_output
avg_best_training_dice
avg_best_training_loss
avg_best_validation_dice
avg_best_validation_loss
avg_test_dice
std_best_training_dice
std_best_training_loss
std_best_validation_dice
std_best_validation_loss
std_test_dice
p-value_testing_script-batch_size=2
p-value_testing_script-batch_size=4
testing_script-batch_size=2
-0.0019473766224109568
-0.0019473766224109568
-0.0024093631698178797
-0.0024093631698178797
0.0009537434430138293
0.0009893736332192554
0.0009893736332192554
3.545588614363517e-05
3.545588614363517e-05
0.0
1.0
0.030020368472776473
testing_script-batch_size=4
-0.0016124938847497106
-0.0016124938847497106
-0.001482845204009209
-0.001482845204009209
0.0009537434430138293
0.00011548220028372273
0.00011548220028372273
0.00022956790548947826
0.00022956790548947826
0.0
0.030020368472776473
1.0
Usage example:
ivadomed_compare_models -df results.csv -n 2 --run_test
- Parameters:
dataframe (pandas.Dataframe) – Dataframe of results generated by automate_training. Flag:
--dataframe,-dfn_iterations (int) – Indicates the number of time that each experiment (ie set of parameter) was run. Flag:
--n_iteration,-nrun_test (int) – Indicates if the comparison is done on the performances on either the testing subdataset (True) either on the training/validation subdatasets. Flag:
--run_testcsv_out (string) – Output csv name to store computed value (e.g., df.csv). Default value is model_comparison.csv. Flag
-o,--output
ivadomed_prepare_dataset_vertebral_labeling
- extract_mid_slice_and_convert_coordinates_to_heatmaps(path, suffix, aim=-1)[source]
This function takes as input a path to a dataset and generates a set of images: (i) mid-sagittal image and (ii) heatmap of disc labels associated with the mid-sagittal image.
Example:
ivadomed_prepare_dataset_vertebral_labeling -p path/to/bids -s _T2w -a 0
- Parameters:
path (string) – path to BIDS dataset form which images will be generated. Flag:
--path,-psuffix (string) – suffix of image that will be processed (e.g., T2w). Flag:
--suffix,-saim (int) – If aim is not 0, retrieves only labels with value = aim, else create heatmap with all labels. Flag:
--aim,-a
- Returns:
None. Images are saved in BIDS folder
ivadomed_extract_small_dataset
- extract_small_dataset(input, output, n=10, contrast_list=None, include_derivatives=True, seed=-1)[source]
Extract small BIDS dataset from a larger BIDS dataset.
Example:
ivadomed_extract_small_dataset -i path/to/BIDS/dataset -o path/of/small/BIDS/dataset -n 10 -c T1w,T2w -d 0 -s 1234
- Parameters:
input (str) – Input BIDS folder. Flag:
--input,-ioutput (str) – Output folder. Flag:
--output,-on (int) – Number of subjects in the output folder. Flag:
--number,-ncontrast_list (list) – List of image contrasts to include. If set to None, then all available contrasts are included. Flag:
--contrasts,-cinclude_derivatives (bool) – If True, derivatives/labels/ content is also copied, only the raw images otherwise. Flag:
--derivatives,-dseed (int) – Set np.random.RandomState to ensure reproducibility: the same subjects will be selected if the function is run several times on the same dataset. If set to -1, each function run is independent. Flag:
--seed,-s.
ivadomed_training_curve
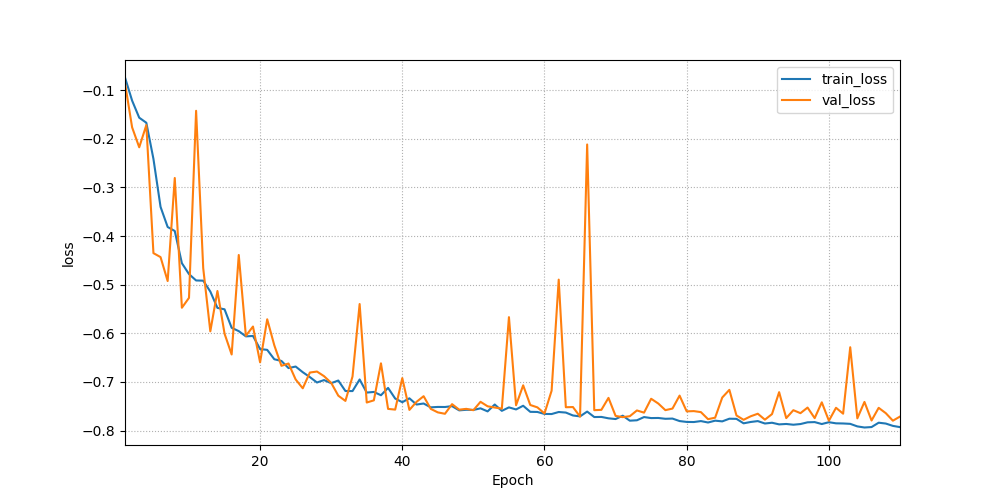
- run_plot_training_curves(input_folder, output_folder, multiple_training=False, learning_rate=False, y_lim_loss=None)[source]
Utility function to plot the training curves and save data as .csv files.
This function uses the TensorFlow summary that is generated during a training to plot for each epoch:
the training against the validation loss,
the metrics computed on the validation sub-dataset,
the learning rate if learning_rate is True.
It could consider one output path at a time, for example:
… or multiple (using
multiple_training=True). In that case, the hard line represents the mean value across the trainings whereas the envelope represents the standard deviation: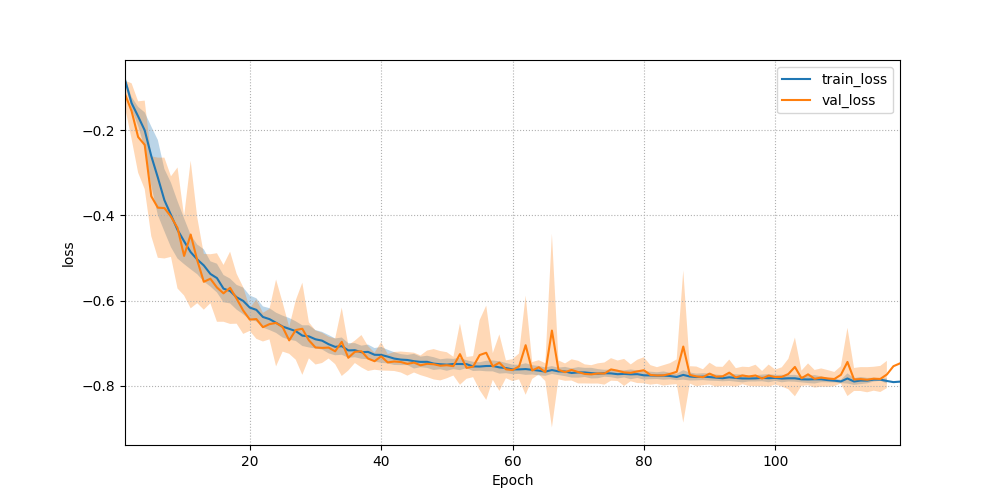
It is also possible to compare multiple trainings (or set of trainings) by listing them in
-i, separated by commas: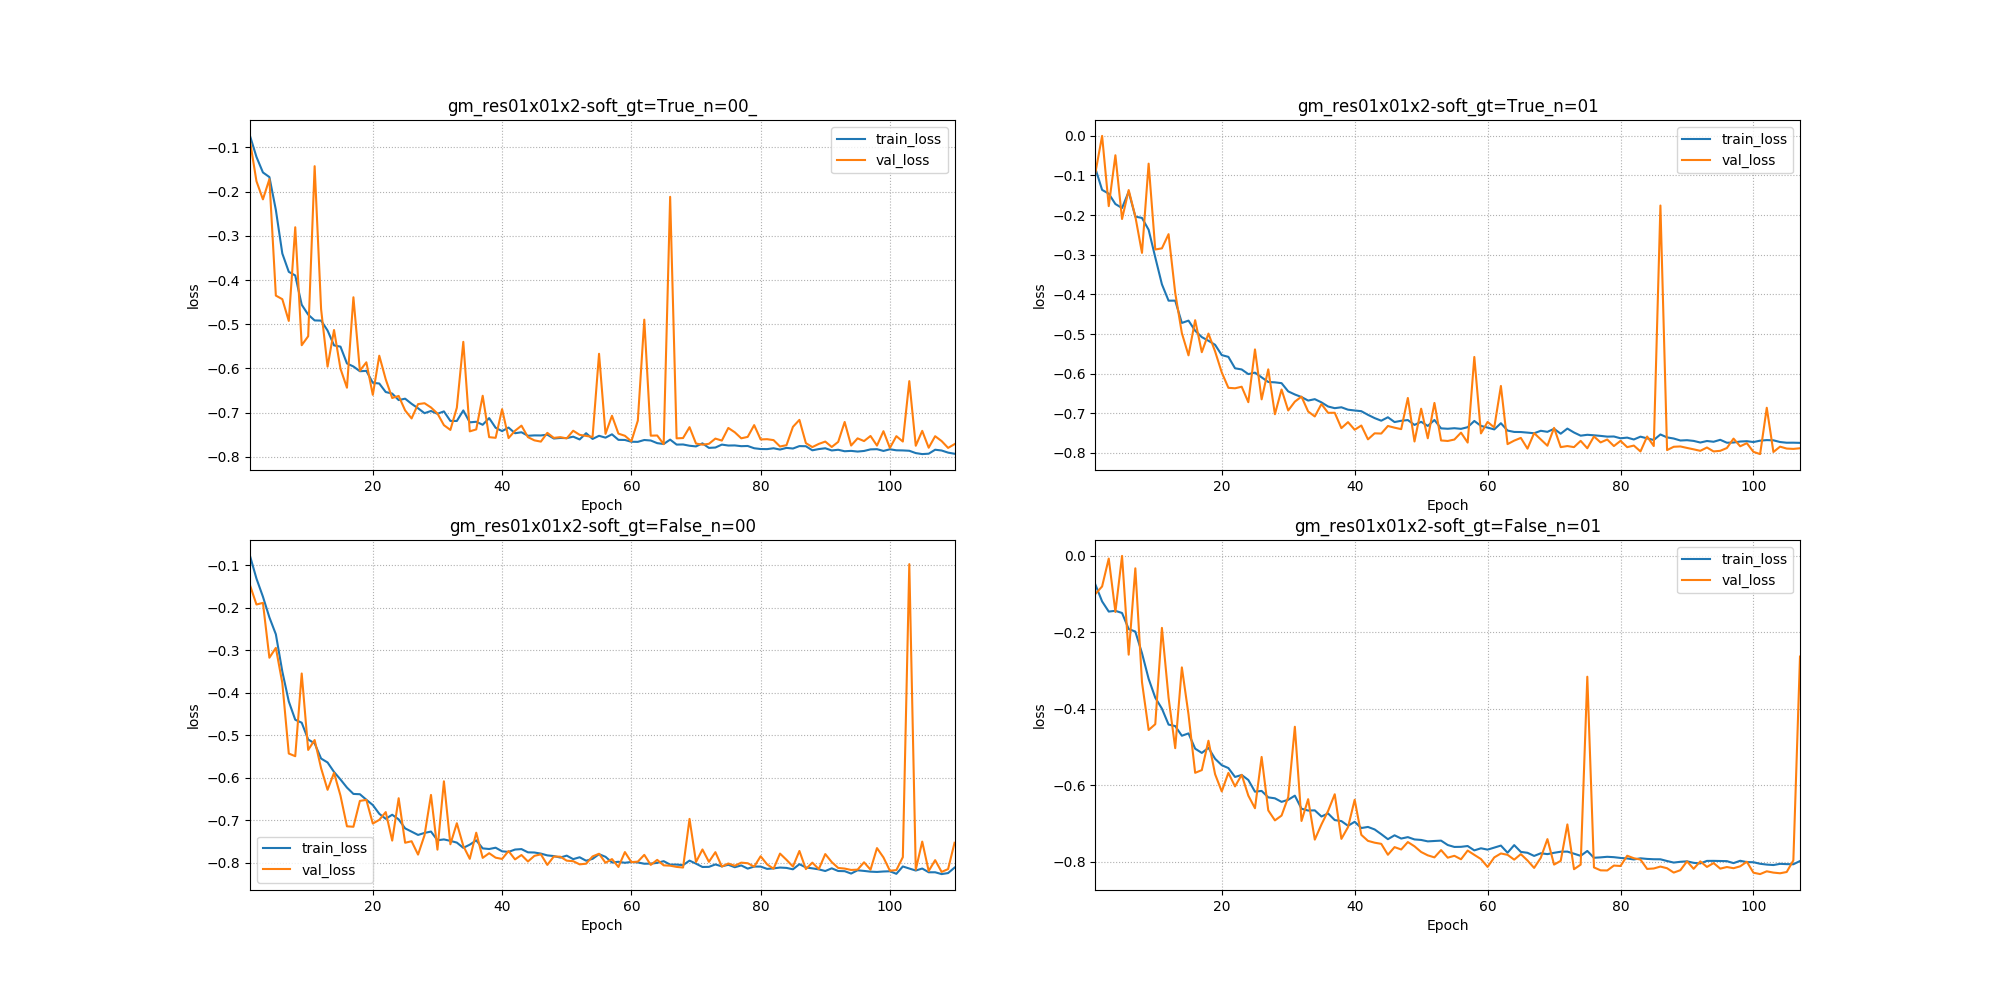
- Parameters:
input_folder (str) – Input path name. Flag:
--input,-i. If using--multiple, this parameter indicates the prefix path of all log directories of interest. To compare trainings (not using--multiple) or set of trainings (using--multiple) with subplots, please list the paths by separating them with commas, e.g. path_output1, path_output2output_folder (str) – Output folder. Flag:
--output,-o.multiple_training (bool) – Indicates if multiple log directories are considered (
True) or not (False). Flag:--multiple. All available folders with-ias prefix are considered. The plot represents the mean value (hard line) surrounded by the standard deviation (envelope).learning_rate (bool) – Indicates if the summary event file for learning rate is considered (
True) or not (False). Flag:--lr. The limits on the y-axis plot are automatically defined.y_lim_loss (list) – List of the lower and upper limits of the y-axis of the loss plot, otherwise these limits are automatically defined. Please separate the lower and the upper limit by a comma, e.g. -1,0. Note: for the validation metrics: the y-limits are always 0.0 and 1.0 except for the hausdorff score where the limits are automatically defined.
ivadomed_download_data
- install_data(url, dest_folder, keep=False)[source]
Download a data bundle from an URL and install it in the destination folder.
Usage example
ivadomed_download_data -d data_testing -o ivado_testing_data
Existing data bundles:
- data_example_spinegeneric10 randomly picked subject from
Spine Generic. Used for Tutorial and example in Ivadomed.
data_testing : Data Used for integration/unit test in Ivadomed.
data_multi_testing : Large Data Used for multi-session contrasts integration/unit test in Ivadomed.
t2_tumor : Cord tumor segmentation model, trained on T2-weighted contrast.
t2star_sc : spinal cord segmentation model, trained on T2-star contrast.
- mice_uqueensland_gmGray matter segmentation model on mouse MRI. Data from University of
Queensland.
mice_uqueensland_sc : Cord segmentation model on mouse MRI. Data from University of Queensland.
findcord_tumor : Cord localisation model, trained on T2-weighted images with tumor.
model_find_disc_t1 : Intervertebral disc detection model trained on T1-weighted images.
model_find_disc_t2 : Intervertebral disc detection model trained on T2-weighted images.
data_functional_testing : Data used for functional testing in Ivadomed.
- data_axondeepseg_semSEM dataset for AxonDeepSeg. 10 rat spinal cord samples with axon and myelin
manual segmentation labels. Used for microscopy tutorial in ivadomed.
Note
The function tries to be smart about the data contents. Examples:
a. If the archive only contains a README.md, and the destination folder is ${dst}, ${dst}/README.md will be created. Note: an archive not containing a single folder is commonly known as a “bomb” because it puts files anywhere in the current working directory.( see Tarbomb)
b. If the archive contains a ${dir}/README.md, and the destination folder is ${dst}, ${dst}/README.md will be created. Note: typically the package will be called ${basename}-${revision}.zip and contain a root folder named ${basename}-${revision}/ under which all the other files will be located. The right thing to do in this case is to take the files from there and install them in ${dst}. - Uses download_data() to retrieve the data. - Uses unzip() to extract the bundle.
- Parameters:
url (string) – URL or sequence thereof (if mirrors). For this package there is a dictionnary listing existing data bundle with their url. Type ivadomed_download_data -h to see possible value. Flag
-ddest_folder (string) – destination directory for the data (to be created). If not used the output folder will be the name of the data bundle. Flag
-o,--outputkeep (bool) – whether to keep existing data in the destination folder (if it exists). Flag
-k,--keep
ivadomed_visualize_and_compare_testing_models
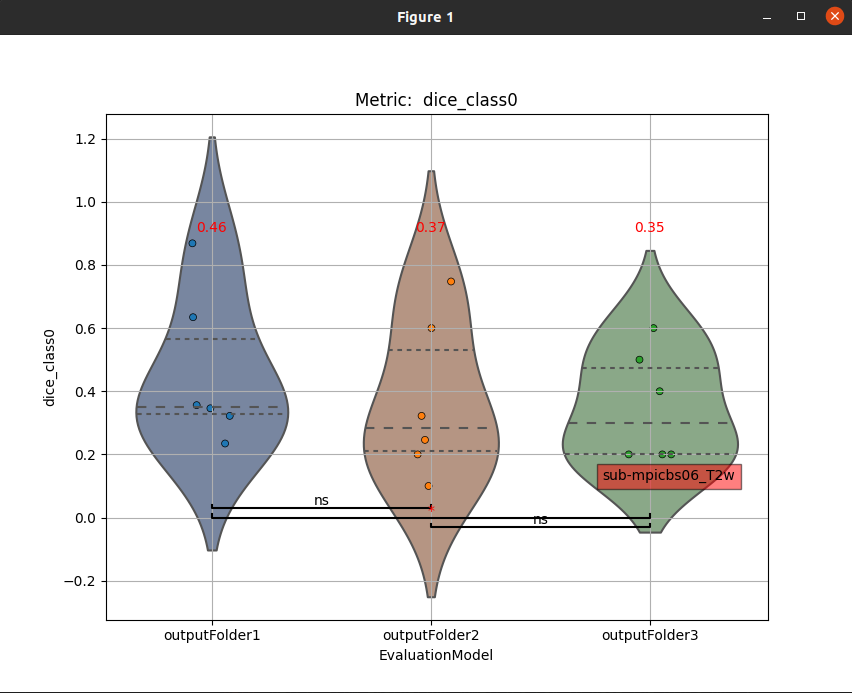
- visualize_and_compare_models(ofolders, metric='dice_class0', metadata=None)[source]
This function allows violinplots visualization of multiple evaluation models simultaneously and performs a Kolmogorov–Smirnov significance test between each combination of models. The mean values of the datapoints for each violinplot is superimposed on the top.
If only one model is selected as input, only the Violinplot will be presented (no test will be superimposed)
The datapoints within each violinplot are interactive. The subject_id and MRI sequence of each point are displayed when clicked (as shown on the violinplot to the right of the example figure below).
Note
If more than 4 model outputs are selected to be compared, the significance tests are not displayed since the figure becomes very busy
Usage example:
visualize_and_compare_testing_models.py --ofolders ~/logs/logs_T1w ~/logs/logs_T2w
                                        --metric dice_class0 --metadata pathology ms
- Parameters:
ofolders (list) – list of folders that contain the outputs of the models to be compared, Flag:
--ofoldersmetric (str) – column of “results_eval/evaluation_3Dmetrics.csv” to be used on the plots (default: dice_class0), Flag:
--metricmetadata (list) – Allows visualization of violinplots only from subjects that match the metadata criteria. 2 elements - (1) column label of the dataframe.csv metadata so only subjects that belong to that category will be used and (2) string to be matched, Flag:
--metadata, Example: “–metadata pathology ms”